- File export format.
- Regional settings.
- Export all issues.
- Report name settings.
- Additional options in export settings.
- Export data to Google Drive.
Netpeak Spider allows exporting almost any report in a few clicks using the ‘Export‘ button on the control panel or the main menu.
Learn more about all possible options of data exporting in the article ‘Saving and export of results‘.
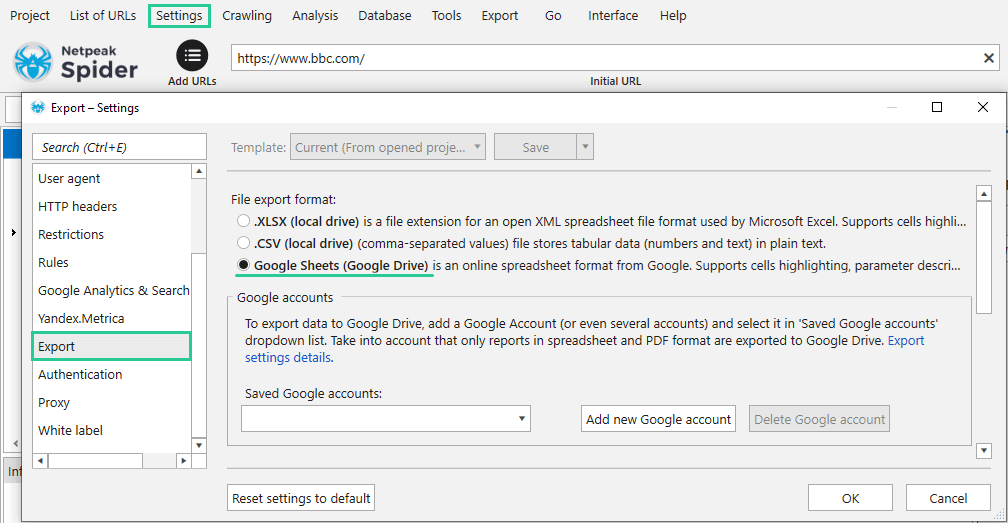
You can choose the format and report parameters in the ‘Export‘ tab of the program settings. Please note that these settings don’t affect data exported from the ‘Dashboard‘, and the ‘Audit of the optimization quality (PDF)‘ report.
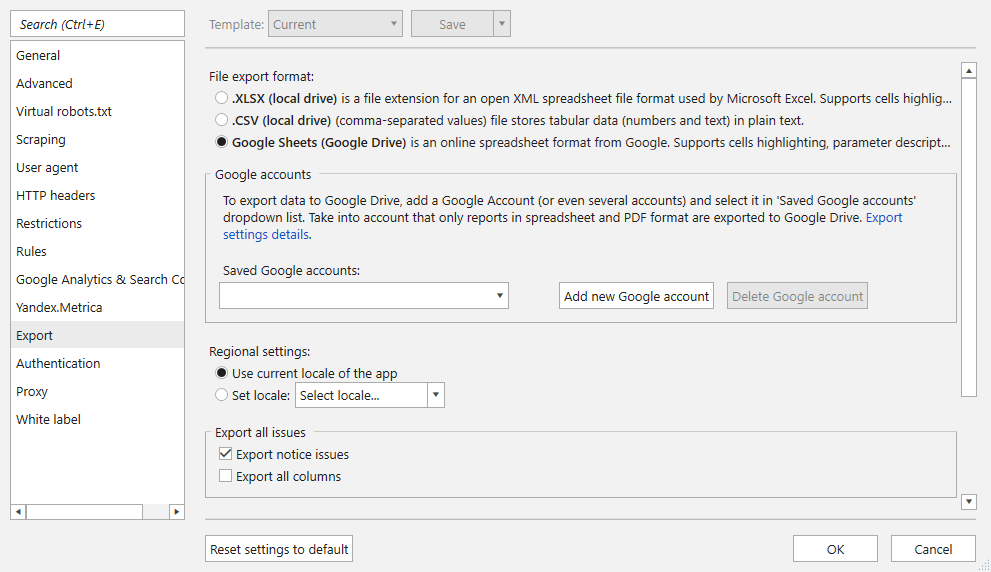
1. File export format
1.1. .XLSX is a common format used by Microsoft Excel. It supports cell selection and parameter description similar to results table in Netpeak Spider.
When exporting a report containing more than 1,000,000 URLs, Netpeak Spider will automatically split the file into several files due to the format limits.
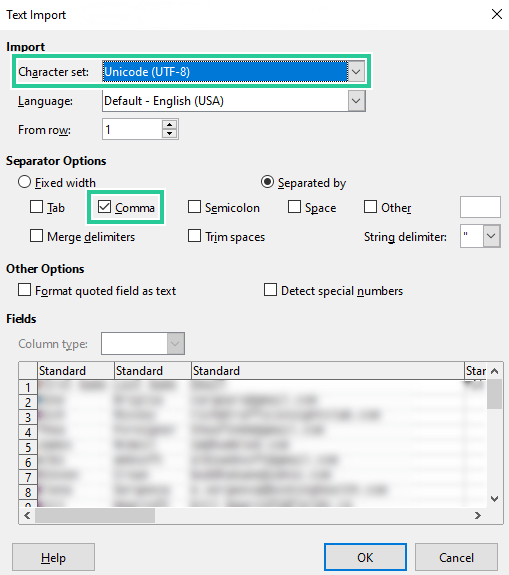
1.2. .CSV is a text format designed to store tabular data.
If you open a .CSV file via LibreOffice, it is important to set the following configurations:
- Character set → Unicode (UTF-8)
- Separator Options → Comma
1.3. Google Sheets (Google Drive) is an online spreadsheet format from Google. Supports cells highlighting, parameter description, and sharing access via link. More about Google Drive setting → in section 6.
2. Regional settings
Using regional settings, you can choose a locale – a set of parameters that defines regional settings of the user interface, such as language, country, time zone, charset, etc. You can:
- Use the current locale of the app according to the language chosen in the general settings (Russian or English). This configuration is set by default.
- Set locale – choose a country and a region from the dropdown list.
The selected locale may affect the date and time format, and delimiters used in exported reports.
3. Export all issues
The ‘Export All Issues‘ section contains the following settings:
Export notice issues → by default, all issues are included to export. But using this setting you can exclude the notice issues from export, as they usually do not critically impact SEO efficiency.
Export all columns → by default, a corresponding set of columns is exported for each issue. Check this setting to enable the exporting of all analyzed parameters.
4. Report name settings
Report names in Netpeak Spider are formed in the following format: export date ~ project name (website domain) ~ issue or table name ~ number of URLs ~ Netpeak Spider ~ HHMMSS. In the ‘Report name settings‘ section, you can configure such settings as:
Add base prefix (project name and date) → tick to let the program automatically add the date (year, month, day) when a project was exported to the name of a file and the name of the project (by default, website domain).
Add issue severity → (works for exporting the ‘All issue reports‘ set) tick to let the program add the severity of issues to the name of the report (Error, Warning, Notice).
5. Additional Options in Export Settings
Save cells highlighting when exporting tables in .XLSX and Google Sheets formats → works for exporting the current table (the ‘Export... ‘ button above the main panel of the program) and allows to export a report with cell highlighting and link formatting.
Include unique hashes to special reports → allows adding the ‘Page Hash‘ and ‘Text Hash‘ parameters to export special reports.
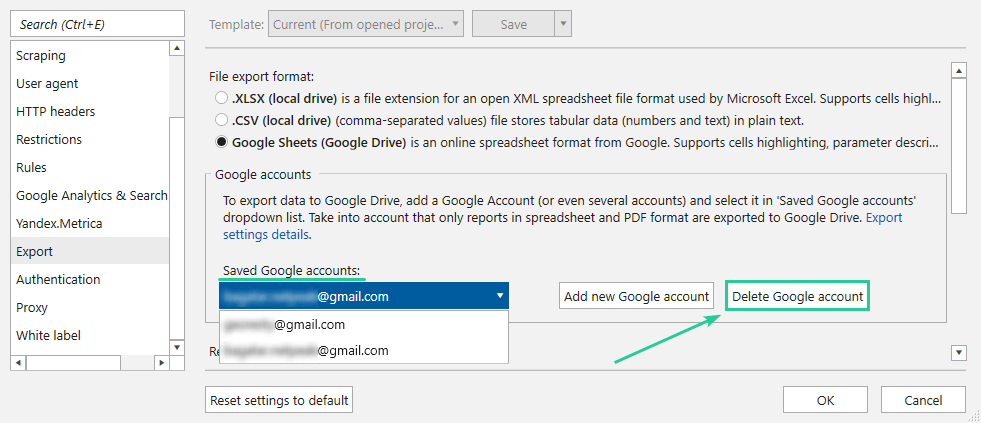
6. Export data to Google Drive
The opportunity to export reports to Google Drive is implemented in the Pro plan.
This feature allows you to export reports or PDF audits for quick share and real-time communication. You need to add your Google account to export data from the program to Google Drive. To do so:
1. Open the ‘Export‘ tab in the settings and choose ‘Google Sheets’ file export format.
2. Click on ‘Add new Google account‘, choose the necessary account, grant all the permissions for further work.
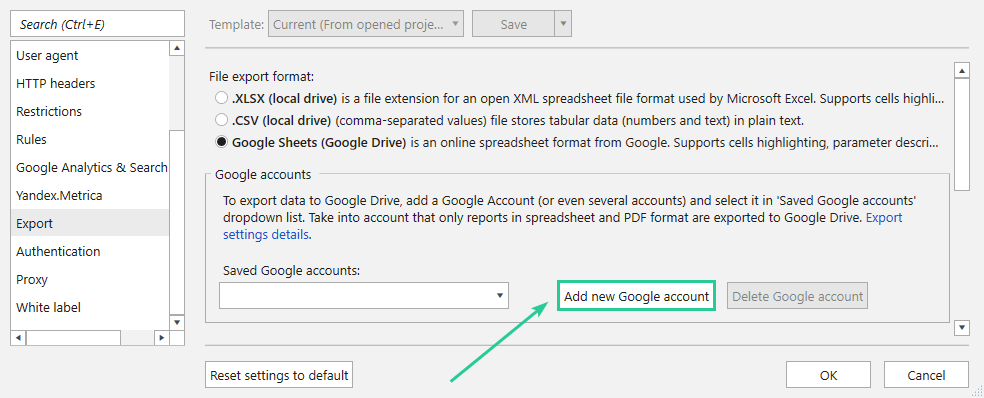

3. After granting the permission in the ‘Saved Google accounts‘ menu, you can see the accounts that will be used as the final destination for crawled data. You can add the unlimited number of accounts. To see all available accounts, click on the dropdown list.
4. If you need to delete a saved account, just choose it in the dropdown list and press ‘Delete Google account‘.
• The program exports only reports in spreadsheet and PDF formats to Google Drive.
• All files and folders are exported to the ‘Netpeak Spider Exports‘ folder. This folder is located at the root of Google Drive.
• If the export is successful, a clickable pop-up will appear informing about the export success. By clicking on the pop-up, you open a browser with a link to the report folder, or the file itself.
• When creating spreadsheets, mind Google Sheets restrictions on the number of cells. If a document reaches the limit during export, it will be divided into several documents.
Was this article helpful?
That’s Great!
Thank you for your feedback
Sorry! We couldn't be helpful
Thank you for your feedback
Feedback sent
We appreciate your effort and will try to fix the article