1. How to Add URLs for Crawling
4. Changing an Initial URL in a Single Project
5.1. Recrawling Particular URLs
5.2. Recrawling the Table of URLs
7. Saving a List of URLs to File
1. How to Add URLs for Crawling
Netpeak Spider allows adding URLs using two ways:
1.1. Enter the address in the ‘Initial URL‘ field → the crawling will be started from the specified URL and will continue until all pages are crawled (unless the crawling is limited in the program settings).
Use the hints to quickly add a URL. They appear below the line when you are entering text. Hints are created based on your previous projects and what you entered before.

1.2. Add a list of URLs → to do it, use the ‘List of URLs‘ menu, hotkeys or control panel.
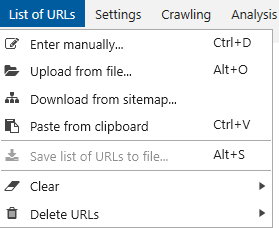
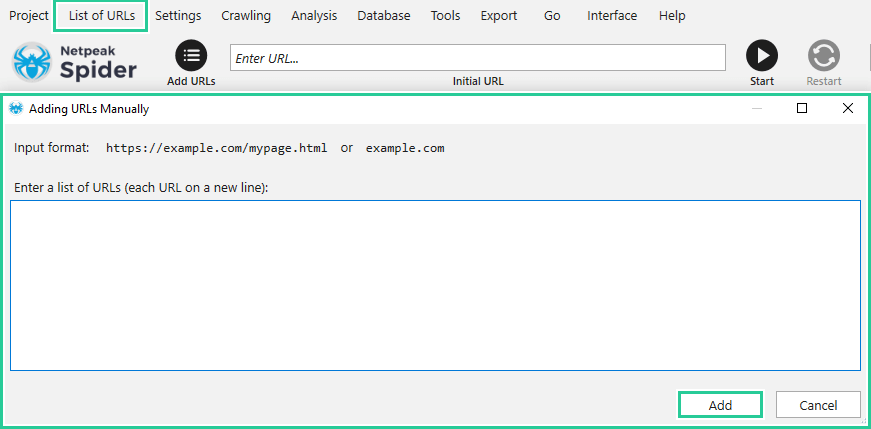
1.3. Enter manually (Ctrl+D) → opens an additional window for entering a list of URLs where each one should be on a new line. After entering all URLs, click on the ‘Add‘ button to save them.
1.4. Upload from file (Alt+O) → imports URLs from a file. The file can have the following extensions:
- .txt (Text file)
- .xlsx (Microsoft Excel)
- .csv (Comma-separated values)
- .xml (XML file)
- .nspj (Netpeak Spider project)
- .ncpj (Netpeak Checker project)
You can also upload a list of URLs from a file using the ‘Add URLs‘ button on the control panel.
1.5. Download from sitemap → the ‘XML Sitemap Validator‘ (Alt+X) tool will be opened. Use this tool to extract a list of URLs from a sitemap. To do it, follow the steps:
- Enter a sitemap URL in the corresponding field.
- Choose the ‘Sitemap (sitemap contents)‘ as the overview mode.
- Click on the ‘Start‘.
- Transfer a list of URLs to the main table.
- Click on the ‘Start‘ button on the main window to start crawling.
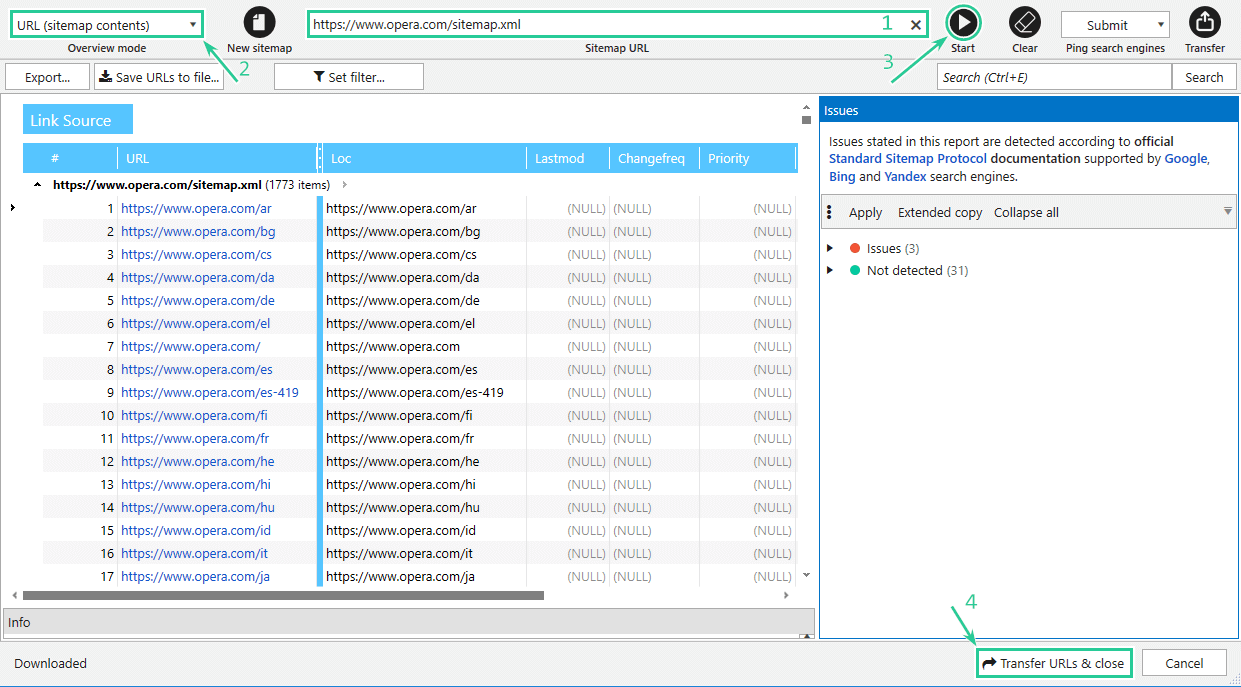
Learn more about using this tool in the article ‘XML Sitemap Validator‘.
1.6. Drag and Drop → drag a list of URLs or a file with the appropriate extension directly into the main table. Netpeak Spider will analyze and add necessary data.
1.7. Paste from the clipboard → use the Ctrl+V hotkey or the ‘List of URLs‘ menu.
2. Processing of Entered URLs
A few things to remember here:
- Netpeak Spider crawls only pages based on HTTP / HTTPS protocols.
- If the protocol is not specified, the program will automatically add safe HTTPS. protocol to the beginning of the URL address.
- The main table can contain only unique URLs.
- URLs will be percent-decoded (are in a user-friendly form).
- Anchors in hash links will be removed. For instance, instead of https://example.com/test/#anchor Netpeak Spider will add https://example.com/test.
3. Crawling Process Features
We want to note that depending on the way of adding URLs, crawling process will differ:
- If an initial URL is entered and the main table is empty, the program will start crawling all website, starting from the initial page and continue until all pages are crawled.
- If the ‘Initial URL‘ field and the table contain some URLs, Netpeak Spider will continue crawling adding new pages to the previous results in the table.
- When there is no initial URLs but the table contains a list of pages, Netpeak Spider will crawl this list, detecting outgoing links but will not follow them.
4. Changing an Initial URL in a Single Project
Netpeak Spider allows you to change the initial URL and add a list of URLs in a single project. This is convenient if necessary:
- To crawl several websites in a single project, for instance, to check duplicate content or their interlinking. Follow these steps to do it:
- When the crawling is finished, replace the address in the ‘Initial URL‘ field to a new one or add a list of necessary URLs into the main table.
- Click on the ‘Start‘ button.
- To crawl certain categories of a website in a single project. Follow these steps to do it:
- Before starting crawling, set up crawling in a folder on the ‘General‘ tab in the program settings.
- Enter the required URL and click on the ‘Start‘ button.
- When the crawling is finished, replace initial URL and resume crawling.
5. How to Recrawl Pages
In Netpeak Spider you can recrawl a part of URLs list, for instance, after you applied some changes on a website.
5.1. Recrawling Certain Pages
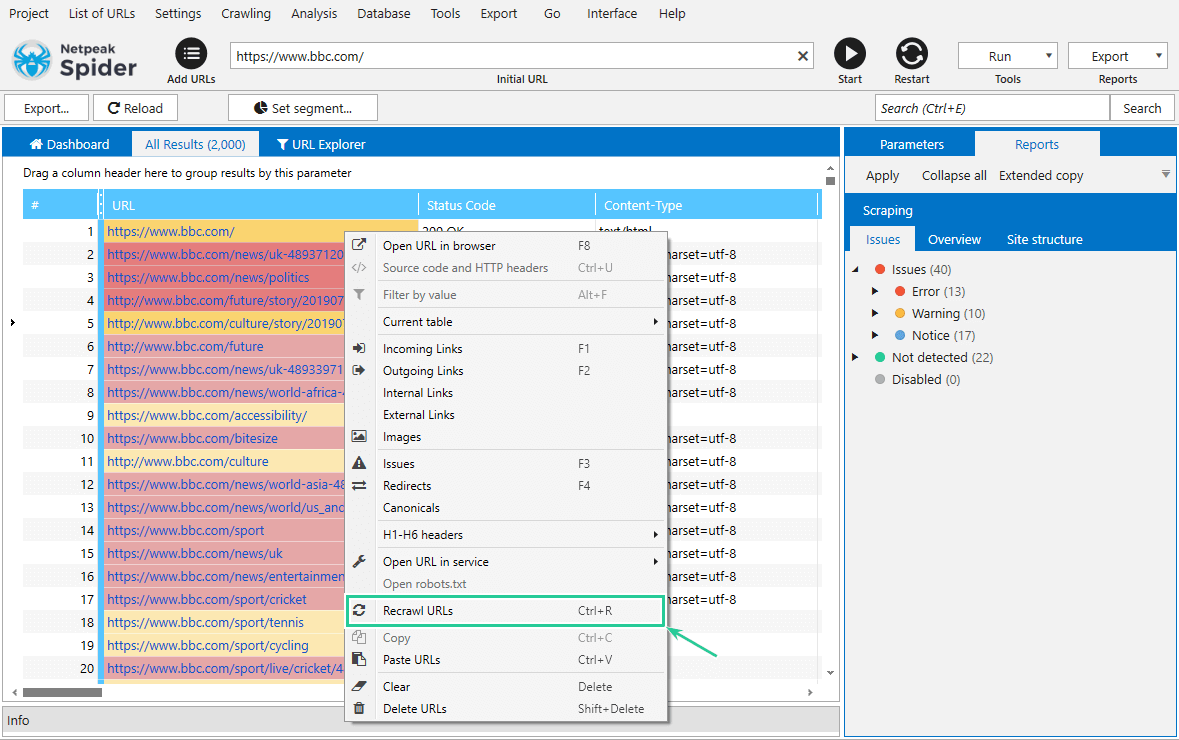
To recrawl one or more pages, select them in the ‘All results‘ table, right-click to call the context menu and choose the ‘Recrawl URL‘ option → Netpeak Spider will update the parameters and links for all selected pages.
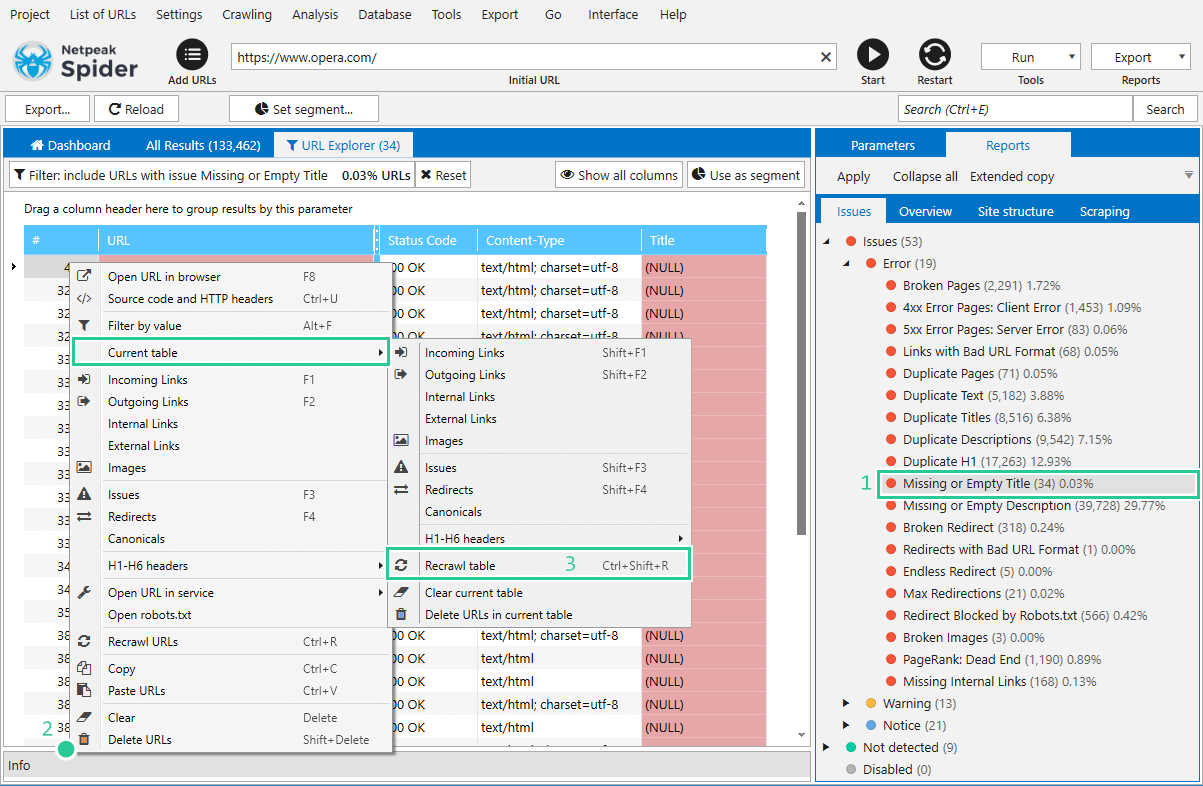
5.2. Recrawling a Table of Results
You also can recrawl a table of results, for instance, after applying some filter. To do it, you need to:
Save a project to have the possibility to return to the initial condition later (it also will save some memory).
Choose a necessary issue report on the ‘Issues‘ tab on the sidebar by which you want to filter the results (e.g. ‘Missing or Empty Title‘)
Right-click on any cell in the ‘Filtered results‘ table and choose ‘Current table → Recrawl the table‘. You can also use hotkey Ctrl+Shift+R.
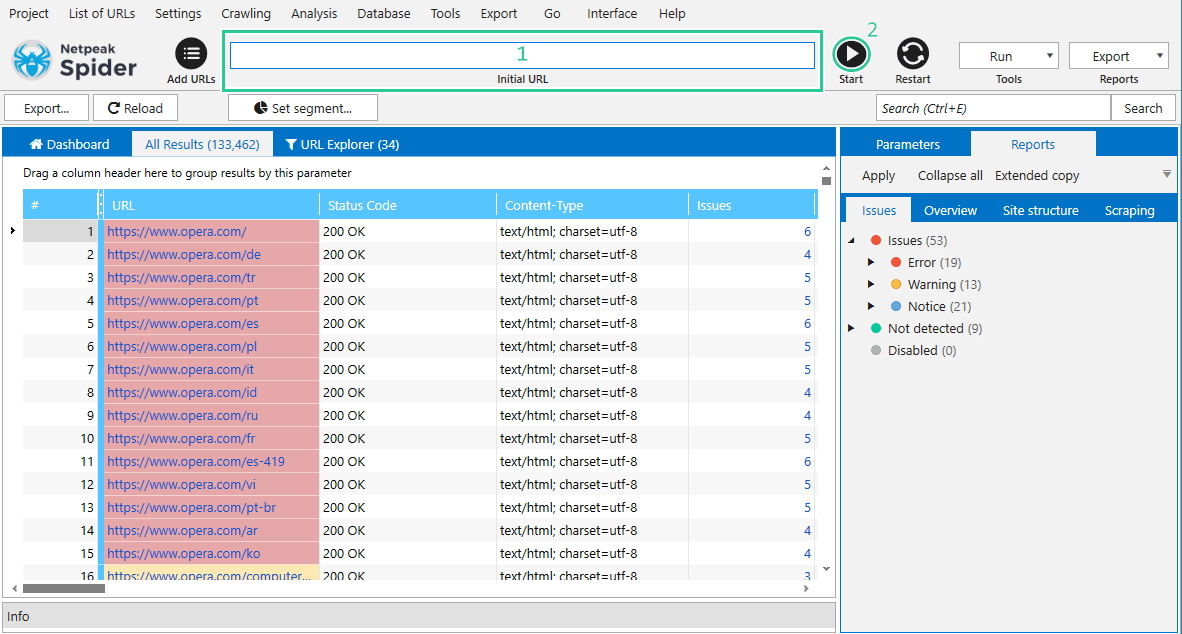
5.3. Recrawling All Results
You can also recrawl all got pages (e.g. after moving a website to HTTPS-protocol): clear the ‘Initial URL‘ field and click on the ‘Restart‘ button → Netpeak Spider will recrawl only those pages that were added into the main table.
5.4. Recrawling Broken Pages
If you have removed the links to the broken pages on your site, to make the program fully display the changes, you need to recrawl a website.
In case, you have not removed the links, and made the pages available by the same URLs, then to see the changes, you only need to recrawl the table ‘Broken pages‘ as described in paragraph 4.2.
6. Clearing and Removing URLs
You can easily remove pages from the result table.
- Select necessary pages
- Use Shift+Delete or choose the ‘Delete URLs‘ option in the context menu
- After these steps, selected pages will be removed and the results will be renewed.
Please note that after pages were removed from the main table, they will remain in the report of outgoing links for pages linking to them.
You can also clear the received data by the selected URLs without deleting the pages from the results table, for instance, to crawl the already received pages after changes in the program settings or on the site. To do it:
- Select the required URLs.
- Press ‘Delete‘ or select the ‘Clear‘ option from the context menu.
7. Saving a list of URLs to File
You can save a list of crawled or pending URLs without data for them as a text document to your device. To save a list of crawled pages, follow the steps below:
1. Open a necessary table
2. Click on the ‘List of URLs‘ → ‘Save a list of URLs to file‘ or use the Alt+S hotkey when you are on the main window.
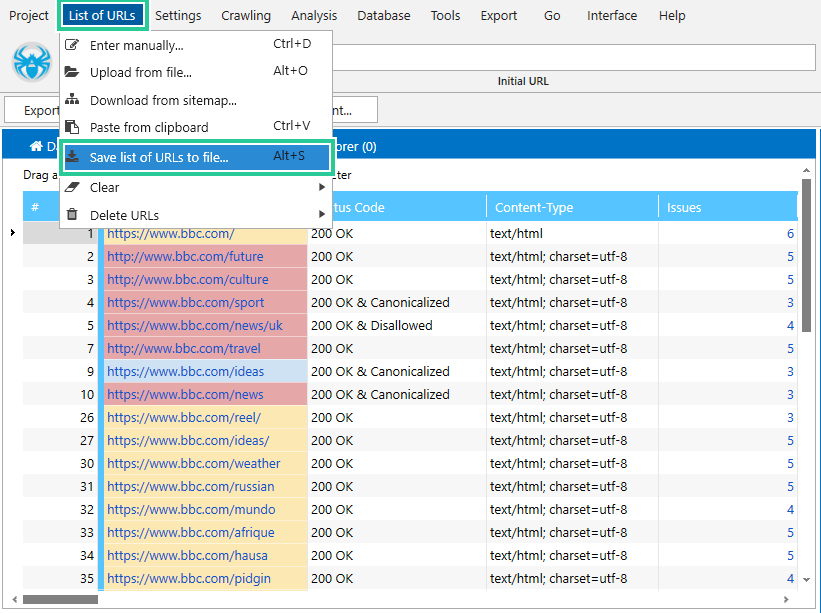
3. Choose a folder for saving and write a file name or use the generated one.
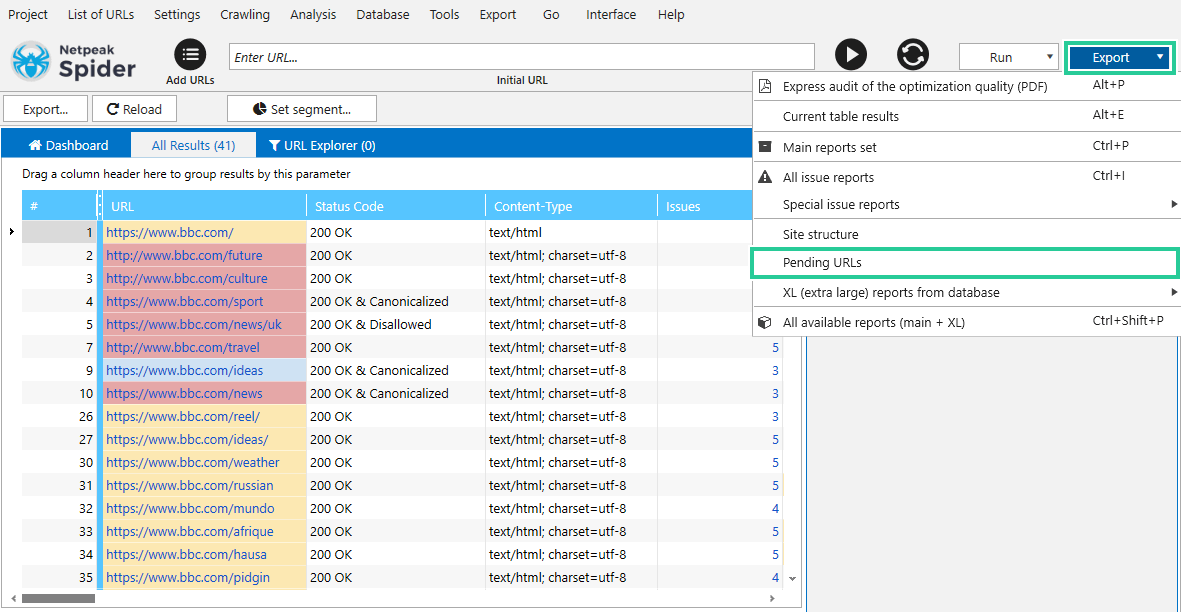
To save pending URLs:
- Pause crawling
- Click on the ‘Export‘ and choose the ‘Pending URLs‘ option
- Choose a folder for saving and write a file name or use the generated one
Was this article helpful?
That’s Great!
Thank you for your feedback
Sorry! We couldn't be helpful
Thank you for your feedback
Feedback sent
We appreciate your effort and will try to fix the article